Tutorial web development (with JSF) III: Basic arithmetics

Basic arithmetics

Ok, (hopefully) everybody knows about the basic arithmetic operations: Add, subtract, multiply and divide. To do this it needs two number,   one of the four operators and the computer spits out the result. A trivial task, you probably can solve by head. But why perform this effort? Let this do our computer so that we can use this in the browser. Continue reading “Tutorial web development (with JSF) III: Basic arithmetics”

Tutorial web development (with JSF) II

A first web application

Next, we will create a very basic web application. This will be done only so far as generated by NetBeans. No more function is added. Even then, this introduction shows some of the basics.

You may build up this app on your pc, or you simply follow this tutorial by its screenshots, depending on your preferred way to learn new technologies.

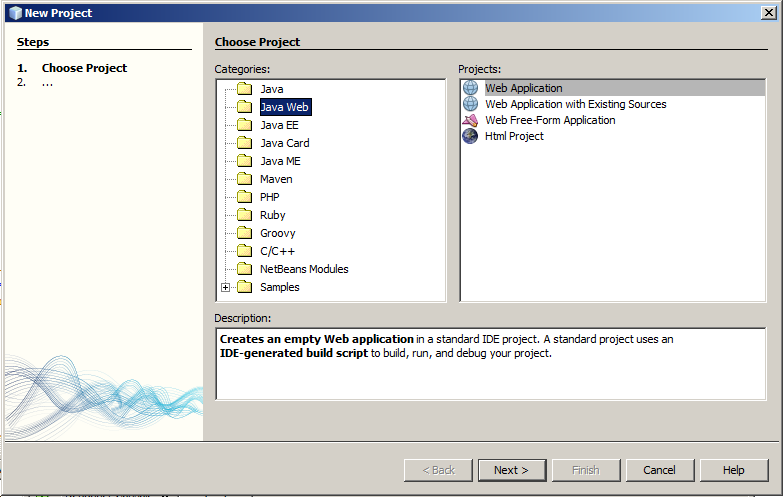
After starting NetBeans, choose a new project (menu file, new project or simply be pressing {Ctrl}+{Shift}+{n}). The dialog shown below appears. Please choose “Java Web” and then”Web Application”. The screens may look a bit different, depending on version, language and operating system.

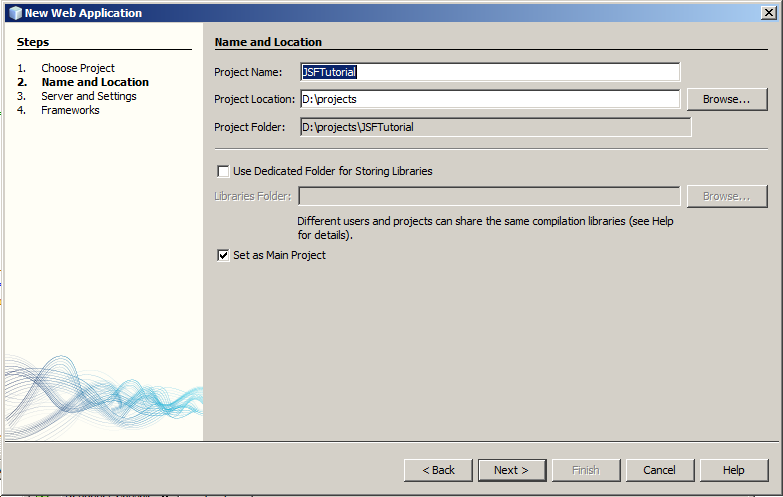
Now click onto [Next]. In the following screen, please choose an appropriate project name. Here I used “JSFTutorial”. If you like to store your project in a different directory than default, change the “Project Location”. Then click [Next].

If you use NetBeans starting with version 6.9 in dstandard configuration, it offers you GlassFish Sever 3.0 oder newer during the next dialogue. If you use a prior version of NetBeans, please update [As of this translation, NB 7.1.2 is available]. All Java Enterprise examples in this tutorial are build upon JEE6. With the rise   of JEE7, which is expected in late 2012, this may change.

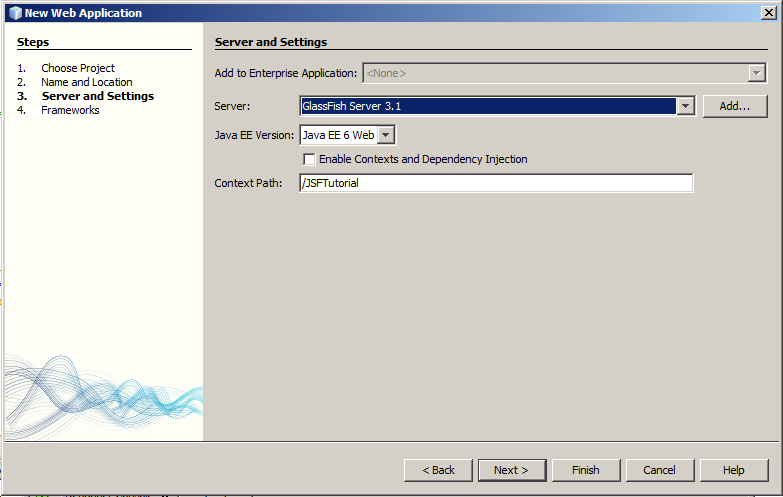
This dialog offers you the opportunity to select context and dependency injection (CDI). This enables “injecting” objects into your application. This might be done by a simple annotation. If you use CDI, this affects the usage of beans (named beans instead of managed beans) too. And the bean’s scope differs a bit. For the moment, we don’t use this great feature, but we will do so for bigger projects.

With Context Path you configure the relative path to invoke your app within the browser. It defaults to the project name and you can use it as is. If needed, this path may be changed later on.

As usual, continue with [Next].

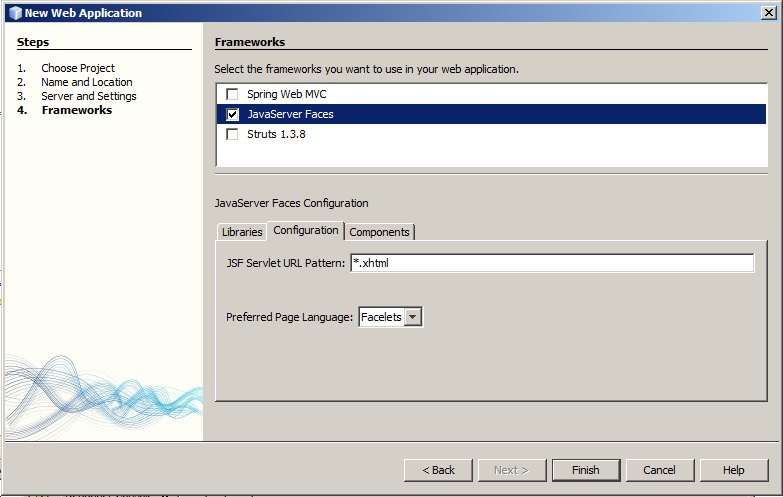
In this dialog please choose the JavaServer Faces as your framework. Below, a tab control appears for a basic JSF configuration. If your server is JEE6 compliant, like GlassFish, it has JSF libraries already available. Thus, you may keep the default. If you use a different server, e.g. Apache Tomcat, you may have to provide the JSF libraries. In such a case you have to choose between registered (within NetBeans) libraries or you have to add your own.

Before closing this dialog, please choose the tab “Configuration” and change the URL pattern to “*.xhtml”. NetBeans here proposes “/faces/*”. This results in a bit longer path, showing everybody which framework you use. For the JSF functionalitiy itself it doesn’t matter. It’s your choice.

The preferred page language defaluts to “Facelets” . Alternaivily you may choose “JSP” (Java Server Pages). In both cases appropriate namespaces are needed and will be included by NetBeans, as well as tag libraries, which allow you to include special statements within your HTML page. These statements will be processed on server side before delivering the page to the browser.

JSP exists for a long term. And they had been standard for JSF till version 1.2. Because they had been developed independent (and before) JSF, they posesses a bit other lifecycle than JSF. Facelets have been especially developed for JSF. Since version 2, Facelets are part of the JSF standard specification and became the preferred page language.

Now you’ve choosen enough and end the dialog by [Finish].

NetBeans generates a complete runnable project and opens the first page, Index.xhtml in it’s code editor.

As distinguishable at the delaration, it is a XHTML page. In the opening HTML tag you’ll find the appropriate namespace and additional a namespace for jsf/html. Traditional the prefix “h” is used for this. You may recognize a first usage at the tags of head and body. Even though these tages are prefixed, after server side processiong you just find these prefixes (in browser, page source code) removed and the standard HTML tags being used. Nothing spectactular happend so far.

Take a look onto the project tree on the left side. NetBeans also generated som config files, which will be descriped later on. Furthermore, all needed libraries hvae been included. Shortly, everything you need to launch the project is available. Let’s start with {F6}.

The first start takes a bit more time: NetBeans starts the app server, deploys your application and then starts it too. Next project start (of the same NetBeans session) will be faster, because GlassFish is already started. In a productive environment, your server is usually up all time. How to deploy in such an environment, even though manually or scripted, will be described in a later part of this tutorial.

After strating the application, NetBeans launches the browser and display the page: Hello from Facelets.

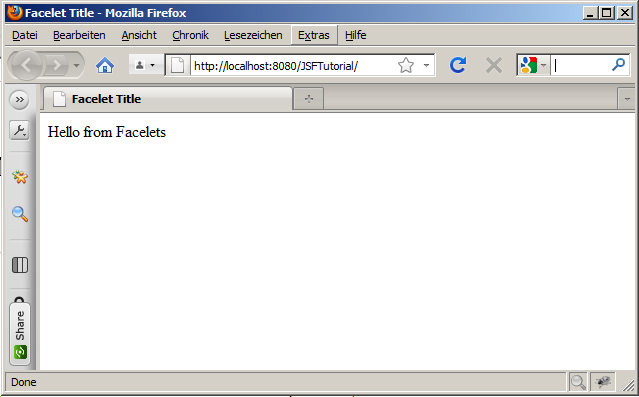
A look onto the URL highlights that the browser requested the local server, and there, the path to JSFTutorial. Remember you? This is exactly the context path choosen within the wizzard on project setup.

A view to the page’s sourc code presents normal XHTML:

<?xml version='1.0' encoding='UTF-8' ?>
<!DOCTYPE html PUBLIC "-//W3C//DTD XHTML 1.0 Transitional//EN"
"http://www.w3.org/TR/xhtml1/DTD/xhtml1-transitional.dtd">
<html xmlns="http://www.w3.org/1999/xhtml">
    <head>
        <title>Facelet Title</title>
    </head>
    <body>
      Hello from Facelets
    </body>
</html>

Comparing with the source within NetBeans, all the JSF/HTML specific namespaces disappeared, as well as the “h:” prefixes. This shows that thes server did some work in background: All specific tags became analyzed and replaced. In this simple project just by some HTML code.

It would be usefull to explain what happens on server side. But before that, in the next part an other application with some server side calculations to be displayed at the client side. It’s getting exiting next.


To web development content.

Tutorial web development (with JSF) I

Tutorial Web Development (with JSF)

This introduction to my tutorial “Web Development (with JSF)” gives you an overview abaut the planned extent. I will provide the tutorial according to my respective temporal possibilities. Hence, changes in extent and content are expressly possible.

Web development – this is first of all a very unconcrete concept which can enclose everything what has to act with the Internet, from an easy HTML page up to a complicated application. In this tutorial this concept refers quite specifically to the development of applications which are usable via browser with the further undermentioned technologies. Therefore it becomes clear that it concerns not static Internet pages, but full applications which are hosted on a server and are available at any place, free Internet access provided. This might be for example, a member’s management, an information system, a communication platform or other.

To realize such an application a whole bundle of different technologies is necessary. On the one hand, the browsers need the representable web pages which are provided by a server. To the other a computer language is necessary. However,not simply a locally running program is created, but a web application.   This usually requires an appropriate platform or Framework. Server-sided the developer must not invent the wheel completely anew. Thus as running environment in the following an application server is used. And what is an application without data storage? Thus a persistence layer as well as a data base system are required. A web application communicates with the user by means of forms and dialogs. The validation of inputs is to take place so fast that the user can work liquid, without having to wait for lengthy reactions of the server. Therefore a part of the application, like input validation, is shifted to the client.

In this tutorial the web development with these technologies takes place:

  • HTML (hypertext Markup LANGUAGE) with CSS (Cascading Style Sheets) to the representation in the browser
  • Java as server-sideprogramming language
  • JavaServer Faces 2,0 as webframework
  • Apache HTTP server
  • Java EE 6 compliant application server
  • Java Persistence API (JPA) 2.0
  • SQL data base (JavaDB, MySQL, PostgreSQL)
  • NoSQL data base (CouchDB)
  • JavaScript for client side programming
  • AJAX as technology to update a page partly
  • XML transformation for producing pdf contents
  • Web services for the solution of special problems

In a tutorial naturally practical examples, screenshots etc. may not be missing. While the technologies mentioned can be used by means of different development environments, is, in order not to blow up the extend of this tutorial, the restriction on a certain environment necessarily. Here NetBeans was selected, since this environment offers all necessary technologies “out of the box” without further configuration. In the introduction example however is shown, how this can take place alternatively by means of Eclipse. As far as you would like to work not with NetBeans, you may transfer the further development accordingly to Eclipse or another development environment of your choice. Similarly this is valid also for the application server. NetBeans comes along with GlassFish 3.x, which can be used without further configuration, manualy deployment etc.. It is however shown, how you install the application detached by NetBeans on this server. Accordingly you can use every other JEE6 comliant server. And for most parts of this tutorial you may use a servlet container like Tomcat 7.x.

Structure of the tutorial

This series of articles is a tutorial. This doesn’t mean that you get presented only simply a set of Screenshots with little explaining textof which you must understand the whole practically. Rather this denotes, you receive information from the practice. With so much Screenshots that you can understand the whole purely mental. It is not necessary that you sit down equal before your computer and strike into the keys. Who would like, may do this naturally also.   A detailed explanation follows the screenshots and listings in each case. Tutorial stands here here for outgoing from the practical example. In this respect it differs from classical books which explain everything and intersperse only a few examples. This tutorial is more concrete, without omitting however the theoretical foundation.

Besides, it goes off quite gently. In the first example it is shown how you create a web application and start it. In the beginning only the generated code is used for it and is launched out of the developing environment. Then you get to know, how you make the application available on an application server – detached from the development environment. Afterwards, this first example is re-implemented by using the Eclipse IDE. In the later process of the tutorials this is left to the interested reader.

Only bit by bit own code is added to the application. An easy calculator originates for some basic arithmetical operations. Even though this example is still quite simple, it already shows server-sided programming, input validation and integration of cascading stylesheets. Some theoretical foundation belongs to that example as well as a quick look to JSF lifecycle. Further applications show the usage of JSF templates, by means of which you can create a (optical) frame for your application.

The member’s management of an association is the first bigger application. It should be accessible only to a certain group of peaple. Besides, is distinguished between persons who may browse a part of the data and those who can select and edit all data. Here thus persistence and authentication are requested.

The second larger application represents an invoicing. In the case study invoices should be able to be edited and printed at the customer’s location. The documents are generated server-sided as a PDF, so that they can be send to any local printer. This example assumes the application server is located in a DMZ (demilitarized zone). However, the data base should be installed not at such an exposed place, but be in the local area network.Furthermore direct access to the data base is forbidden within that DMZ . Hence, the access occurs indirectly by means of an other application server which is addressed via web services.

As bridge to other web technologies it is shown later on, how these web services can be addressed by a Dot.NET application. Further the alternative data storage is represented by means of CouchDB.

Although this tutorial especially concerns web applications, an essential component of Internet offers is pure information: Static or dynamically generated contents are displayed. This performs a HTTP (or simply Web) server usually better than an application server. And in such a way you learn the use of the application server behind a HTTP server. Besides, the HTTP server accepts the inquiries from the web, and then decides whether it simply delivers contents or  or forwards however the request to the application.

Even if this tutorial starts a small example, it primarily addresses persons who already have programming knowledge in Java. Indeed, HTML and CSS belong in the repertoire of every web developer, but just with the entrance in this area some  Java developer may  not have suitable knowledge. Hence, you find some accompanying information in compact form  as well as links on deepening information.

The main focus of this tutorial is on the development of applications, not on the installation of the environment. Hence, the practical part also does not start with vast installation instructions.

Best of all you can understand of this tutorial by means of NetBeans. You find this  development environment under http://netbeans.org/downloads/index.html.  Select there either the package “Java EE” or ” All” and install this according to instructions. Prerequsite  is an installed Java JDK. If you do not have installed this yet, then you find a suitable link in the download area of NetBeans.


To web development content.

JSF tutorial

I needed more work than I thought to finish the list of my reviews (see books). Especially this list growed during this time and will do in the future. The next magazines will be published soon…

But, I now started with a JSF tutorial, wich will I publish here. Cause I need this at work to train my colleagues, I hope it will be ready soon.